Making one clip longer is different from making a longer film. If your goal is a story, a few short shots and a clear edit may work better than one long take.
Start with the route that fits the video, then count the seconds you’ll actually keep.
Do you need a longer shot or more shots?
Continue the same action: use a supported extension mode. Check how long the input can be and whether the returned file includes the original.
Tell a story: make separate shots and join the useful parts. You can replace one weak shot without remaking everything.
Runway’s long-form guide recommends tracking shot continuity and saving full generated motion for moments that need it. A still hold or a simple cut can do other jobs.
Make a presenter-led explainer: plan the spoken script, presenter, voice, and supporting visuals. A long presentation render isn’t the same as a continuous cinematic generation. Check the presenter’s current limits separately.
Choose How to Make the Video Longer
A duration headline is useful only after the production task is clear.
- Continuous shotContinue
Preserve an existing action across added time.
- Check source and extension limits
- Check whether the original is returned
- Review motion and sound at the boundary
- Multi-shot storyAssemble
Independent shots serve a planned sequence.
- Reuse subject references
- Retain useful intervals
- Account for trims and overlaps
- Presenter / narrated pieceExplain
A different workflow built around a script.
- Check the presenter’s current conditions
- Plan supporting visuals and captions
- Do not compare it as one cinematic take
Method note. Three different jobs. Check the chosen tool’s current limits and price.
Based on the linked official guides, checked .
Count the time after trims and transitions
A returned six-second clip may only have five seconds worth keeping. A crossfade then overlaps that clip with the next one, shortening the combined timeline again.
For sequential clips with no speed changes or extra inserts:
Finished time = retained clip time − transition overlap.
A hard cut doesn’t subtract time. Count each crossfade overlap once. Titles, stills, and pauses add their own screen time; they aren’t newly generated motion.
A worked one-minute plan
For this illustrative seed-exchange film, choose twelve six-second clips: 72 seconds of selected footage. Keep five seconds from each for 60 seconds before transitions. Eleven quarter-second crossfades remove 2.75 seconds, leaving 57.25 seconds. A separate 2.75-second title would bring the edit to a minute. These are planning assumptions, not measured output.
Where the Seconds Go
Original seed-exchange scenario with all quantities declared as assumptions.
- 01Selected source takes72 sec
12 chosen clips × 6 seconds. Retakes are separate.
- 02Trimmed intervals60 sec
Keep 5 seconds from each of the 12 selected takes.
- 03After overlaps57.25 sec
11 joins × 0.25 seconds overlap = 2.75 seconds removed.
Method note. Example: 12 × 5 − 11 × 0.25 = 57.25 seconds before added titles. No speed changes. Bars share a 72-second scale. Two attempts per take would mean 144 generated seconds; that is an assumption.
Based on the linked official guides, checked .
| Part | Shots | Time before overlaps | What to show |
|---|---|---|---|
| Arrival | Four | 20 seconds | Place, table, packets, volunteers |
| Exchange | Four | 20 seconds | Choosing, labeling, handing over, thanking |
| Departure | Four | 20 seconds | Packed seeds, note, exit, final detail |
If the handover is hard to generate, a packet close-up and a reaction shot might tell the same story. Replace footage by the job it needs to do, not by how much effort you spent generating it.
Keep the next shot easy to make
Save approved character/product references, location images, prompts, and settings. Give each shot a short action and a note about what should match the previous one.
The reference-photo checklist helps with repeated subjects. The prompt guide helps turn each action into a clear instruction.
Choose the edit’s shape and frame rate early. Different outputs can be combined, but don’t leave the conversion decisions until export.
Three ways to connect the footage
1. Extend an existing clip
The xAI extension endpoint documents grok-imagine-video, a 2–15-second MP4 source, and 2–10 added seconds. It returns the original plus the continuation. Output keeps the source aspect ratio and resolution, subject to a 720p cap. These limits belong to that endpoint.
An eligible eight-second source plus six added seconds returns fourteen seconds. Don’t place the eight-second original before that returned file or you’ll repeat the opening. Repeated extension also has to respect the source-length limit; it doesn’t mean unlimited generation.
2. Start the next clip from the last frame
Runway’s guide explains taking the last frame of a finished clip, using it as the next image input, then joining the clips in an editor and removing the shared frame if needed.
A still carries no sound history. Listen across the join, even if the picture looks close. For a new camera angle, a deliberate cut can be cleaner than trying to hide every transition.
 Open full size ↗
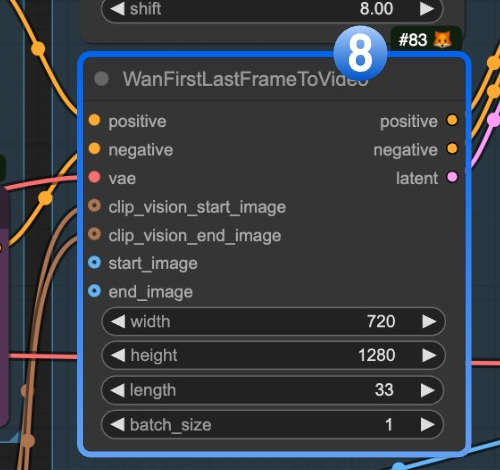
Wan2.1 first/last-frame control node, cropped to interface controls only. No input or generated picture is reproduced.
Screenshot: Comfy Org documentation contributors. Official guide · GPL-3.0 · UI-only crop · Retrieved 2026-11-02.
The official Wan first/last-frame example shows two separate image inputs. It helps explain endpoint control, but it isn’t the same operation as extending an existing moving clip.
3. Put separate shots on a timeline
Runway Stitch Videos combines at least two existing clips, up to 60 minutes total. Find it in Apps, add clips, arrange them, and select Stitch. That’s an assembly limit, not sixty minutes of newly generated action.
 Open full size ↗
OpenFilm Studio, shown with an empty project. This is the publisher’s interface capture, not a NexAtlas film or a completed edit.
Screenshot: OpenFilm contributors. Official guide · MIT · Screenshot · Retrieved 2026-11-02.
- Import your chosen clips.
- Trim the parts you will keep.
- Arrange picture and sound, then check the exported file.
Use an editor that lets you trim, place clips in order, adjust sound, and export. The screenshot shows OpenFilm Studio as an example of the layout, with an empty project.
Fuser’s Compositor documentation describes synchronized layers and MP4 export, not proof of end-to-end sequential editing. Passing a scene to another node also isn’t the same as exporting a file. Check the actual editing function you need.
For a real editing walkthrough, this Venice chapter starts at 14:40:
- This part of the official walkthrough begins at 14:40.
- It covers bringing clips onto the timeline, trimming, transitions, and a shared music track.
Watch on YouTube ↗ · Official walkthrough. Loads after your click and starts muted. YouTube’s privacy rules then apply. Use the player controls to turn on sound.
Watch and listen across every join
Check the Cut Before Making More Clips
Visual continuity, sound continuity, and editorial meaning are separate checks.
- 01PictureLook
Framing, frame rate, duplicate boundary, motion direction, subject details.
- 02SoundListen
Levels, ambience, dialogue timing, and unwanted gaps.
- 03StoryDecide
Keep, trim, replace, or change the cut according to the story job.
Method note. An editing checklist, not measured test results.
Based on the linked official guides, checked .
Before making the rest of the film, check one connection at normal speed, then pause near the cut:
- Does the picture jump because the shape or framing changed?
- Is a duplicated frame making the action stall?
- Does the character or prop still look right?
- Does the movement suddenly reverse?
- Does the sound get louder, stop, or change rooms?
- Does the sequence still make sense?
Trim, change the cut, adjust sound, or replace the failing shot. Keep a note of the actual problem rather than guessing a quality score.
Budget for takes you won’t use
If each of our twelve chosen six-second takes needed two paid attempts, we’d generate 24 × 6 = 144 seconds. We’d still have 72 selected seconds and 57.25 seconds after the stated trims and overlaps. Two attempts is an assumption, not a success-rate claim.
At a verified rate of r dollars per generated second, that footage consumes 144 × r. Minimum payments, still images, sound, tax, and your time are separate. See AI video cost per minute.
Keep the project file and source clips when you export. Play the exported file too: check the opening, captions, joins, audio, and ending. A clear file map makes a later request to replace one scene much easier.
Quick questions
Is video extension the same as expanding the picture?
No. Extension adds time; spatial expansion changes the visible canvas or framing. Pick the feature that matches the job.
Can I make an unlimited-length film?
These sources don’t establish unrestricted, reliable movie generation. Check each mode’s conditions and build a sequence you can repair.
Should I use a crossfade at every cut?
No. The quarter-second fades above explain the math, not a required style. A hard cut is often clearer and doesn’t create overlap loss. For a separate small-budget plan, see the $30 film guide.
Sources and method notes
Sources checked November 2, 2026. Media credits and licenses appear with each item.